There is nothing quite like bacon, whether it be in a sandwich, chopped into lardons or to enhance the flavour of the dish. In the UK we have back bacon which might be known in other countries as Canadian bacon. This bacon is also made without nitrites which I will explain a bit more about in a moment. It will keep for around 2 weeks in the fridge or can be wrapped and frozen
Table of Contents
Making Your Own Back Bacon
Back bacon is cured pork loin. The pork loin is not the same as a tenderloin, a loin is from the back of the pig. In this way it differs from streaky bacon which is from the belly.

Curing your own pork loin is so much better than buying ready made bacon as there are a number of options to really maximise flavour and texture which are often not available in store bought bacon.
Why Cure Your Own Bacon?

In this recipe we are using pork loin and buying a piece of meat like this we can really ensure the quality and also we get a lot more for the money we are spending compared to buying bacon.
I’m sure most people have experienced bacon that seems to shrivel when it hits the heat and noticing lots of water forced out into the pan as you cook it. Curing your own pork eliminates these issues and the end result is a much better bacon.
You also get to carefully choose the ingredients and particularly select the best pork loin to make your bacon with.
What To Look For When Buying A Pork Loin?

What you’ll notice about a lot of Canadian bacon is there is very little fat on it. It is usually trimmed into a small medallion of lean meat. I actual fact the pork loin which is from the back of the pig is covered in a thick layer of fat and the tail of the loin has streaks of fat and this makes for much more flavour in cured bacon.
Fat Or No Fat
It is really personal preference if you want to cure a pork loin with fat on. I like it, there is a lot more flavour and when fried the fat renders and becomes meltingly tender or even crisp if cooked long enough.
If you ask your butcher to trim the fat off then you will end up with an oval piece of meat that is usually pretty lean.
Have The Bone Removed
Pork loin comes either on the bone or off. I prefer to buy it off the bone which means you aren’t paying for the excess weight and you don’t have to bone the joint yourself. There is some argument to suggest you cure the pork loin on the bone to avoid it curling or changing shape but I have never had an issue with this.
Remove the Skin

A pork loin usually comes with skin on. If you roast a whole pork loin then it goes crispy and makes crackling.
For bacon there is no benefit to the skin and it won’t go crispy when cooked so I prefer to have it removed by my butcher. If you want keep the skin and make pork scratchings or chicharrones.
Dry Curing
I use a dry cure for my bacon pork loin and the cure itself is very simple.
Dry Cure vs. Wet Cure
Wet curing involves dissolving the salt and sugar in water and then submerging the loin in the brine.
In many cures, pink salt is used and this is called prague powder / instacure or more specifically sodium nitrite. This bacon recipe involves no nitrites so why is that?
Curing Bacon With & Without Nitrites
If you cure bacon at home then you can choose whether or not to use sodium nitrite which is a preservative most often used in processed meats such as ham, bacon, fresh sausage and so on.
The reason why nitrites are used is because they prevent bacterial growth in preserved meats. In products like bacon which needs cooking before you eat it they are always stored in the refrigerator and in most cases do not get stored a long time before being eaten.
The most obvious reason why nitrites are used in commercial bacon is to preserve the colour of the bacon which will remain rosey pink after curing.
Curing With Just Salt
Curing bacon with just salt still inhibits bacteria from spoiling the bacon and when we cure the bacon it is done in the refrigerator throughout the entire process.
It takes just three days to cure a bacon loin so there is no need to use nitrites. The bacon is not going to be kept for long enough to spoil because it is so delicious you will have eaten it within a week.
If you cure a large pork loin and you intend to keep it longer than a week or two then the best thing to do is to cut it into slices or sections and freeze it.
That being said, if you want to use nitrites you can. I would suggest reading this guide on curing salts.
Making Our Dry Cure Mix

My preferred dry cure is simply salt and brown sugar mixed together. You can if you want add flavours, switch the sugar maple add bay and peppercorns or herbs but I like the simplicity of just the two ingredients.
I refer to the great book Charcuterie by Michael Ruhlman for my cure quantities. It is easiest to make up a batch of cure mix in bulk and then keep this in a sealed container until you are ready to use it. The quantities are as follows
Dry Cure Mix Recipe
- 450g Salt
- 340g Dark Brown Sugar
If using Curing Salt / Pink Salt (optional for this recipe)
- 50g Pink Salt / Prague Powder #1 / Instacure #1
This mix is enough to cure a lot of pork we only will be using around 60g or so, just enough to thoroughly dredge the pork loin in.
Cured Pork Loin Recipe
Now we have the cure mix made up we just need to get the pork loin and we are ready to make the bacon.
I like to cure my bacon in a plastic bag and if you have one a vacuum bag is a great tool to use for curing. It helps to keep the cure against the pork and force it into the meat quickly. If you don’t have one use a ziplock bag and squeeze as much air out of it as possible before sealing.

Cured Pork Loin - Curing Your Own Bacon
The simplest and most delicious cured bacon you are going to find, anywhere!
Ingredients
- 1.5kg - 2kg / 3 - 5lb Pork Loin (boned and skin removed)
- 60g Dry Cure Mix (see above)
Instructions
Get the pork loin out of the fridge and unwrap it. If it is tied or rolled for any reason remove the string and pat the loin dry with a paper towel.
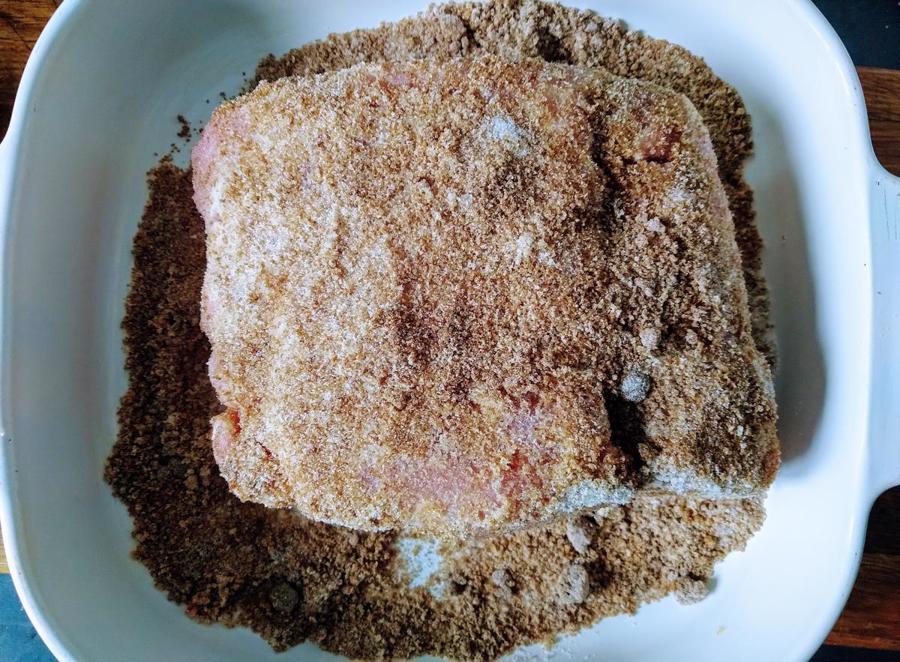
- Get a dish and sprinkle a small layer of the salt and sugar cure mix in the bottom. Sit the pork loin in the cure, cover the pork loin with the cure mix and try to get a nice thick even coat across the entire surface of the pork.

- Once the pork is thoroughly coated drop it into the bag and either vacuum out the air or squeeze as much air out as possible (lowering the bag into a bowl of water will help it form around the meat). Put the pork back into the refrigerator and leave it for 24 hours.
- After 24 hours in the fridge you will notice a lot of liquid has been drawn from the pork. Turn the bag over to redistribute the liquid and cure and leave for another 2 days turning a couple of times in between for an even cure.
- After 3 days the cure will have penetrated right through to the centre of the pork loin. If it is particularly thick (more than a couple of inches) you can leave the bacon to cure for 1 or 2 more days in the fridge. I find 3 days is enough in most cases.
- Remove the bacon from the fridge and open the bag and drain off the liquid, there is no use for this liquid so pour it down the drain. Thoroughly rinse off the cure from the pork loin and then pat it dry. The bacon is now ready and you have a couple of options with what to do with the cured pork loin.

Recommended Products
As an Amazon Associate and member of other affiliate programs, I earn from qualifying purchases.

Nutrition Information:
Yield:
40Serving Size:
1Amount Per Serving: Calories: 327Total Fat: 15gSaturated Fat: 5gTrans Fat: 0gUnsaturated Fat: 8gCholesterol: 136mgSodium: 78mgCarbohydrates: 0gFiber: 0gSugar: 0gProtein: 45g
Slice & Cook As Is

This cured pork loin can be sliced and fried as it is and is what some people refer to as green bacon which means it is unsmoked.
The beauty of curing your own bacon is you can slice it however thick you want, make lardons or roast the whole joint so there is a lot of versatility. If you want a bacon sandwich then slice it and fry like normal.
When you fry bacon that you cure yourself you will notice hardly any water come out of it, it just goes to show the difference with commercial bacon that is rushed and cured too quickly.
Smoke It
Another option is to smoke the whole pork loin after curing. This obviously add loads of flavour at the same time as cooking it over a low, slow heat. I have a kettle smoker and although it is a bit more work it is definitely worth doing.
How Long Does A Home Cured Pork Loin Last?
Keep the cured pork loin in the fridge and it will be fine for at least 2 weeks. If you find there is too much slice it into portions and either wrap it up or vacuum bag it and keep it in the freezer for a couple of months.


I have #1 Prague powder. So is that all I need to cure a 5lbs loin. Nothing else? Could liquid smoke be used also?
Along with salt, sometimes sugar and your Prague powder you can make an unsmoked bacon. This is pretty common in the UK, Ireland and I think Canada.
Smoking the bacon either with liquid smoke in the cure or after curing will give you a nice smoked bacon.
You can add liquid smoke to the cure if you prefer the flavour.
This is a great cure I have made a number of times but this week I used smoked salt crystals and a tablespoon of “Smoke Dust” which is primarily smoked paprika. This added a nice smokey taste as I don’t have a smoker.
What is the wet cure method?
Wet curing would involve soaking the meat in brine. Basically, immersing the pork in a salty liquid rather than rubbing the meat with salt.